Friday, January 25, 2013

Tag..You're a Valentine!

Hi Bloggers!

I have a tag for you today. It's not a standard shaped tag but my daughter always says I'm a bit goofy, so that's OK.  The stamps I used are, of course, from Just For Fun Rubber Stamps and I'm having a great time coming up with different ways to use them. You should also check out their Blog 'cause the design team has been posting some great inspiration there in addition to their personal blogs.

OK, here is the tag I designed.

 
I love the rose petals (actually they are leaves) but in red they are petals stenciled over a background of "Love" stamped over and over. .(E2658 Love)  The Versamagic ink allows the stamped background to come through.


I thought the leaf looked a lot like a heart...don't you? And there is just a bit of bling extending from the top of the "heart" that I picked up in the wedding isle somewhere. I decided this was the perfect spot to place my greeting..C2242 Happy Valentine's Day. 

 
I freehanded the outlines on the petals, first with a black, fine-tipped Pitt pen and then with a white pen and added just a few hearts.

 
I thought the red ribbon looked a bit too blank so I stamped one of the images from the CB9020 Romantic Cube a couple of times and it was just enough.
 
Hope I've given you some inspiration today....now go "heart" someone.
 
Just For Fun Rubber Stamps Used:
 
Supplies Used:
Quilt sewing template for tag shape
Archival ink
Versamagic ink
May Arts ribbon
Grosgrain ribbon
Spellbinders stencil
Distress ink & blending tool
Pitt Pen
White Pen

Friday, January 18, 2013

Love Post

Hi Bloggers!

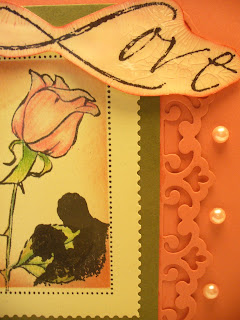
I have another Valentine's Day card for you.  You will probably guess from yesterday's card and today's card that I love, love, love the silhouetted couple stamp. Today's card is a softer take on Valentine's Day and I hope you like it and it gives you inspiration. As always, the stamps used are from Just For Fun Rubber Stamps and I've provided links for you if there is something you just can't live without :) 


Stamps Used:
 
Supplies Used:
Rose card stock
Natural card stock
Artichoke card stock
Archival ink
Distress ink
Crackle medium
Spellbinders border die
Sakura gelly roll pen
Pink pearls
May Arts ribbon
 
Have a Great Day!


Wednesday, January 16, 2013

Romance, Romance, Romance

Are you ready for some romance on Valentine's Day? This silhouetted Romantic Couple, the American Beauties and lace just ooze with Valentine's Day Romance.


The finished card is 5 x 7. I cut the card stock and folded in half. I cut a piece of vanilla and ran through the Cuttlebug using an embossing folder and then sponged lightly on all the corners with light pink ink. I attached two strips of lace that I found in my stash to the left side of the embossed card stock with 1/8" red line tape. Next I die cut an oval die from mirri card. I stamped the American Beauty Rose on white and colored with pencils. I stamped the silhouetted couple in black ink and fussy cut. To bring out the colors a bit more, I rubbed Microglaze over the rose and silhouetted couple. When putting all layers together I used 1/16" foam squares that I purchased from a $1 store and it was just enough to raise each layer just a bit. I hope you like the card and will be inspired to create your own bit of romance. Thanks for checking out Just For Fun Rubber Stamps and the blogs of the design team members.

Happy Valentine's Day everyone and don't forget to "heart" someone!

Stamps Used:
H2247 American Beauties
F2734 Romantic Couple

Supplies Used:
Pink card stock
Vanilla card stock
Mirri card (pewter)
Lace from my stash
Adirondak ink
Archival ink
Red line tape
Embossing folder
Spellbinder's oval die
Prismacolor pencils
Microglaze
1/16" foam squares

Friday, January 11, 2013

My Heart "Pops" For You

Hi Everyone,

I have another Valentine's Day card for you created using Just For Fun Rubber Stamps. This one could be for a female or male and it is a pop-up card. Seems we can never have enough "masculine" cards in our creative stash.  Hope you like it and it inspires you in some way. 


The fold is at the top of the card. Red card stock was cut 4 1/4" x 11" and folded in half.  I cut a strip of herringbone red and white and added to the bottom 1/3rd of the card. A piece of washi tape was placed on either side of the strip, overlapping just a bit. I die cut a decorative piece for my words, inked slightly on inside and then stamped in black.
 
For the inside, I cut a piece of white card stock about 1/8" smaller all around than the red. Fold in half and mark lightly with pencil across the folded edge where you would like the pop outs to fall. I made mine kind of skinny so they wouldn't show behind the hearts. My measurements were: 7/8", 1 1/4", 1 3/4", 2", 2 3/4", 3 1/8". The first one is cut on the 7/8" mark and 1 1/4" mark. Second is cut on the 1 3/4" and 2" mark. The third is cut on the 2 3/4" and 3 1/8" mark. Cut from the fold up to the desired length you want your image to pop forward, i.e. my first two cuts were 1" long, second cuts 1 1/2" long, third 1 1/4" long.  You will now have to fold the strips you just cut to the inside, or the opposite direction that your card fold goes. Be gentle so as to get a nice crisp fold on each one.  I hope this makes sense to you. If not, leave a comment and I will respond. Stamp your hearts on decorative paper, cut out and attach to the pop outs as desired. I added a piece of decorative paper to the inside top and inside bottom. Also added three strips of washi tape on the inside to continue with the theme on the outside.  Stamp "Happy Valentine's Day" and give or mail to someone special.
 
Don't forget to stamp some hearts on the outside of the envelope if you are going to be mailing your card. 
 
Just For Fun Rubber Stamps:
 
Supplies Used:
My Mind's Eye 6x6 Blush
Carta Bella 6x6 Beautiful Moments
Anna Griffin Decorative Tape
Spellbinders Die
Archival Ink


Thursday, January 3, 2013

Getting a Jump on Valentine's Day

Happy 2013 to everyone. January 1 is always a special day for me as my daughter was born on this date.  Happy Birthday Marissa. 

Since Valentine's Day is just around the corner and I am sure you card makers will be looking for ideas so you can get started making your art.  Today I'm showing you a card that involves some fussy cutting but if you are like me, this gets done while sitting in my recliner in front of the TV.  I will list below the photos the materials used to make this card.  If you are wondering where to purchase the images used visit jffstamps.com  I will be using Just For Fun stamps exclusively while on the design team and you can have them either on wood, cling, or just good 'ol rubba....  AND... they have a geat sale going on for the start of the new year so check it out below. 


Year End Special!
To thank you for your patronage during the year we are once again offering our Year End Special. It will begin December 31 and run through January 18. All online retail orders will receive 35% OFF and your savings will be shown in red at check out. www.jffstamps.com   Since we will be closed until January 3 to spend time with our family and friends; all orders will begin shipping that week.


Okey dokey, here is the card:


Stamp the hearts on decorative paper and cut out. Stamp the rose on green card stock and cut out all but the flower. Stamp the cherub, color with pencils and cut out. Cut two rectangle deckle shapes and with die still in place, use sponge to color red ink lightly around the edges. Stamp the padlock image on gold paper and cut out. Slit at the top of the padlock and attach around the flower stem.  Attach all onto red card stock of choice.  Add glitter to cherub's wings. Now give to your sweetie!

Supplies Used:
CB9026 Heart Cube
G2873 Rose
CB9020 Romantic Cube

Cosmo Cricket "Tea for Two" 6x6 pad
Prismacolor Pencils
Spellbinders deckle die
Archival black ink
Red distress ink